Employee Movement
Why should I use this form?
Use this form to initiate movement process for an employee.
What are the Pre-requisites?
The following masters should be available:
· OU
· Designation
· Grade
· Department
· Location
· Region
· Calendar
· Position
· Paygroup
· Compensation Template
· Reason Master
· Action Reason Role Mapping
· Employee Movement Configuration
Who can access this form?
This form shall be visible to all employees to whom the visibility is given in Setup HRMS à Module Role Mapping/ Module Administration.
How to navigate to this form?
Employee Life Cycle à Employee Movement à Employee Movement.
Selecting an employee
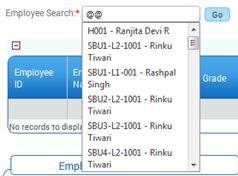
Enter ‘@@’ in the Employee Search field, which populates list of employees in a drop down, as shown here:
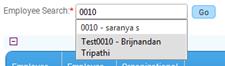
You can also enter employee ID or Name to filter the search. For example, in the screenshot given below, the employee ID has been entered, and hence the drop down is showing records based on the entered employee ID.
If Role player logs in and search for employee, all employees will be available for selection. However if a Manager logs in and search for employee, only their direct reporting employees will be available for selection.
![]() If
[Go] button is clicked without selecting any employee, all the
employees under the logged in employee’s facilitation is populated in
the grid. It is possible to choose multiple employees for initiating
bulk movement.
If
[Go] button is clicked without selecting any employee, all the
employees under the logged in employee’s facilitation is populated in
the grid. It is possible to choose multiple employees for initiating
bulk movement.
Selecting the ‘All’ check box on the grid will choose all listed employees for doing bulk Movement.
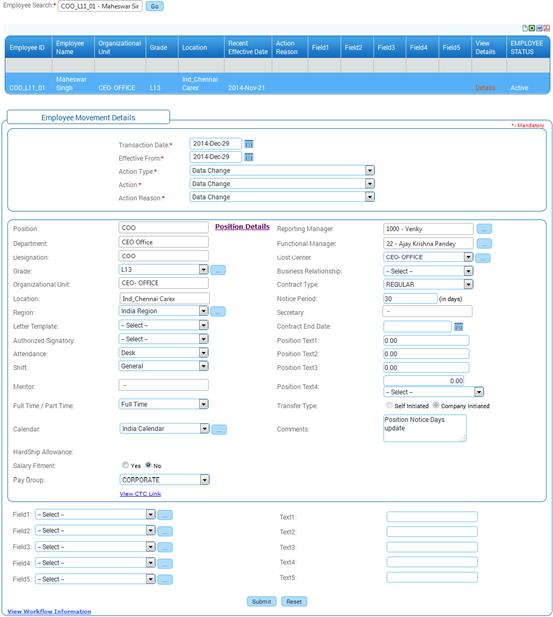
1. Click [Go]. On clicking this button, the selected employee’s work details such as Position, Department, Designation, Grade, OU, Region, Reporting Manager, etc., are populated in the form.
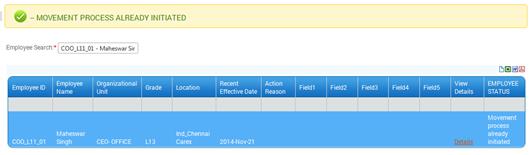
Note: In case if the selected employee’s movement has already been initiated which got rejected due to some reason, system gives an option to see those details, as highlighted in Employee Movement screenshot. The user can validate the rejected record, then modify and resubmit the rejected record. Delete option is also given to delete the rejected record, in case no resubmission is required.
Clicking the ‘Delete’ link will delete the rejected record. On clicking this link, system shows a message asking the user to confirm the deletion.
Clicking [Ok] will delete the rejected record.
Note: You cannot initiate a new movement for an employee whose movement transaction is already initiated and rejected, unless the rejected record is either deleted or re-submitted after necessary changes.
2. If there is any movement record for the selected employee which has been rejected by the approvers, this section displays the record.
3. Click the ‘Details’ link on the grid to view the current and proposed employment details of the employee. On clicking this link, the details will be shown in a pop up window.
4. Select Transaction Date. This is to indicate when the Transaction has actually occurred. One more input is captured in Employee Movement form to record the transaction date. Based on this date, the data in employment details form are shown in descending order with latest transaction date on top.
5. Select Effective From Date. This is to indicate that the changes will be in effect from the date selected here.
6. Select Action Type, Action and Action Reason that are applicable for the employee movement.
![]() Note:
Fields in this form is enabled/disabled based on the edit option set in
the Employee Movement Configuration form for the selected Action Type,
Action and Action Reason combination. For example, ‘Transfer
Type’ field will be enabled only if this field is marked as ‘Edit’ in
the Employee Movement Configuration form.
Note:
Fields in this form is enabled/disabled based on the edit option set in
the Employee Movement Configuration form for the selected Action Type,
Action and Action Reason combination. For example, ‘Transfer
Type’ field will be enabled only if this field is marked as ‘Edit’ in
the Employee Movement Configuration form.
Select appropriate Position. On selecting the Position Number, the Department, Designation, Grade, and Organization Unit which are applicable to the selected Position will be populated.
Note: If selected position is not mapped to any location, then the employee’s current location will be shown in this field.
7. Select the Letter Template.
8. Select the Authorized Signatory. This field shows the list of Authorized Signatories who are mapped in Authorized Signatory Master (Admin à Setup Masters)
9. Select the Attendance option for the employee.
10. Select Shift of the employee, if there is any change due to the movement.
11. By default, Mentor field shows the current Mentor’s name from Employment details form. It can be changed, if required.
12. Select Full Time or Part Time of the employee, if there is any change due to the movement.
13. Select the Calendar of the employee, if there is any change due to the movement
14. If Notice Period is available in Employment Details form, then it is shown in this field. If the employee’s Position is changed, then the notice period applicable for the selected position will be shown here. If the selected Position does not have any notice period, then the current notice period days is shown.
15. Option is available to capture Secretary. By default it shows the current Secretary’s name from Employment details form.
16. Select the Transfer Type.
Note: If the Transfer Type is selected as ‘Company initiated’ then, the Hardship Allowance will be applicable for the employee.
17. Enter ‘@@’ to select Reporting Manager of the employee. On entering ‘@@’, list of employees are populated in the drop down field, from which the Reporting Manager can be selected.
18. Similarly select Functional Manager.
Note: On selecting the Reporting Manager, Functional Reporting Manager will be automatically shown. This is based on configuration setting. If the value of ‘IS_FUNREP_CHANGE_REQ’ is set as ‘Y’, then the auto assign of Functional Reporting Manager will happen. If the value is set as ‘N’, then the auto assign will not happen.
A validation is provided to show alert if the Reporting Manager and the Functional Reporting Manager are same. This is based on configuration setting. If the value of ‘RESTRICT_REPORTINGTO_SAME_FUNREPORTINGTO’ is set as ‘Y’, then this validation happens and system shows alert message. If the value is set as ‘N’, then this validation does not happen.
19. Select Cost Center from the drop down list.
20. The Pay Group for the selected CTC Template will be shown in the field.
21. Select the Business Relationship.
22. Select the Contract Type of the employee.
23. Select the Contract End Date.
24. Position Text1, Position Text2, Position Text3, and Position Text4 – If any other data (numeric) is required to capture, these fields can be renamed by label editor form and it can be used.
Note: Position Text4 – Updated exchange rate value is populated based on the currency selection from the dropdown.
25. Enter Comments if any.
26. Select if Salary Fitment is required for this employee or not. If this option is selected as ‘Yes’, then the [Compute CTC] button will be enabled, which facilitates modifying the CTC details for the employee.
27. Click the ‘View CTC Details’ link to view the current CTC details of the employee. On clicking this link, the current CTC details will be shown in a popup window.
28. Click [Compute CTC] to compute revised CTC of the employee. A pop up window with the compensation details will open. This will display the details such as employee name, OU, grade, designation, location and the effective from date.
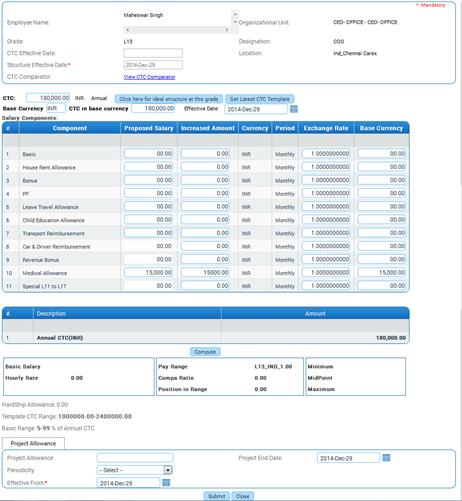
Employee’s Name, Grade, OU, Designation and Location are shown by default.
CTC Effective Date - Latest record’s effective date of employee.
Structure Effective Date – shows the effective date that has been selected in the Employee Movement form.
[Click here for ideal structure at this grade] - On click of this button, the system will re-calculate all Formula components while retaining the current values of the Fixed and Flexi components. Click on Compute will re-calculate the values once again.
[Get Latest CTC Template] – Clicking this button will reload the Fixed Component values from the CTC Template form. This will load with ideal values populated for all fixed components (if given in the CTC template). Click [of compute button] will calculate all Formulae components afresh.
[Compute] - If value of certain components is changed (ex. Basic) and computed, then all the dependable formula components alone would be recalculated (Flexi components will remain unchanged).
· Enter the CTC amount and click [Compute].
Note: CTC can be entered here only if the ‘CTC Change’ option is made as editable in the Movement Configuration form for the selected Action, Reason and Action Type.
· Click [Compute] to check if the total amount and the CTC match. If there is any mismatch, then system shows alert to the effect.
29. Provide necessary details and click [Submit] in the Compute CTC popup window. This saves the CTC details entered and closes the popup window.
30. Click [Submit] in Employee Movement form. On submission, it would be sent for approval.
31. Click [Reset] to refresh the form.
Validations
If the employees shown in the grid are already transferred and is pending approval, then it is not possible to transfer that employee again, until it is approved/rejected. System throws alert message as shown below, in such cases.