Leave Request
Why should I use this form?
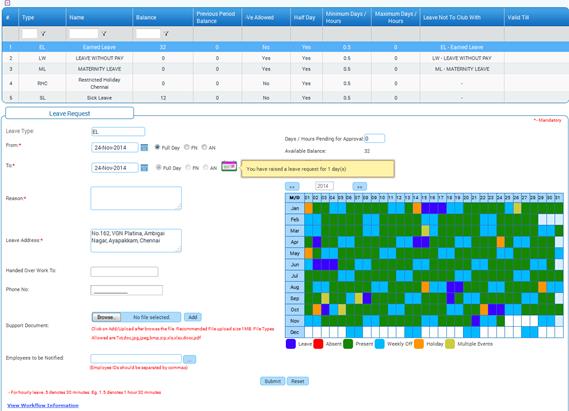
Use this form to request for leave. In addition, you can view details of leave types based on eligibility in the grid, along with current leave balance, whether negative balance allowed, etc. Click on any leave to apply for leave.
Note:
· The DOJ Anniversary Leave and Founder’s Day Leave can be availed for only one day.
· The DOJ Anniversary Leave and Founder’s Day Leave can be availed only on the basis of parameters specified on the ‘Can be availed’ option set in Leave – Additional Configuration form.
· The LOP will be considered based on the LOP calculation setting set in Leave – Additional Configuration form.
What are the Pre-requisites?
· Leave type should be available
· Leave Credit Configuration should have been done
· Leave Balance should be available
Who can access this form?
This form shall be visible to all employees to whom the visibility is given in Setup HRMS ® Module Role Mapping/ Module Administration.
How to navigate to this form?
Self Service à Absence à Leave Request.
The leave request form will show the accrued leave balance on selecting the leave dates. The accrued leave balance will be shown to employee in case of future credited leave and this display is controlled through adrenalin configuration ‘DISP_FUTURE_BALANCE’. If this configuration is set as ‘Y’, then the accrued leave balance will be shown as on the request date. If it is it set as ‘N’, then system does not show the accrued leave balance.

Carry forwarded leave balance and expiry of the same can also be made visible here. If the configuration “DISP_EXPIRY_BALANCE” is set as ‘Y’, then the expiry of carry forwarded leave balance will be shown as a tool tip on mouse over on calendar icon. This is shown based on the period as set in 'Carry forward Leave Balance expiry in months' field under Truncation tab in Leave Configuration form.
List of leave types that are applicable to the logged in employee is shown in the gri. If no leave type is applicable for the employee, then this grid will be empty. The following attributes will be shown in the grid against each leave type. Let’s know what each attributes mean;
· Leave Type – A short form for the long leave name. E.g.: Sick Leave will be short named as SL.
· Leave Name – Name of the leave type – The longer version.
· Balance – shows the current year’s balance available for the leave type, as on the current date. If leave is requested in the current year and approved, the number of leave days will be debited from this balance.
· PP Balance – shows the past/previous years’ balance available for the leave type, as on the current date. If leave is requested in the previous year and approved, the number of leave days will be debited from this balance.
· -Ve allowed – this indicates whether negative balance is allowed for the leave type. If it is yes, then the employee can apply for leave even if there is no balance is available for the leave type. Otherwise it is not possible to apply when there is no balance.
· Half Day – this indicates whether half day leave is allowed for the leave type. If it is yes, then the employee can apply for half day leave. Otherwise, the employee cannot apply for half day leave.
· Min.Days – this indicates the minimum number of days to be applied for a particular type of leave. If this is not met, then the leave request cannot be submitted.
· Max.Days – this indicates the maximum number of days to be applied for a particular type of leave. If it exceeds this limit then the leave request will not be submitted.
· Leave type not to club with – this indicates the leave types which cannot be combined with any other leave type.
· CO-Valid date – this shows the validity date till when the compensatory off leave can be availed.
The field guidelines are as follows:
Field |
Description |
Leave Type |
Leave name of the selected Leave type appears in this field. |
From/To |
Select From date to specify the date from which the leave is applied. Select To date to specify the date, till when the employee would be on Leave. Note: By default, the To date is defaulted to the selected From date. It is possible to change it, if required. |
Reason for leave |
Enter the Reason to avail Leave. Note: It accepts alpha numeric & special character. The width of this field is limited to 250. |
Leave Address |
Enter the Address to communicate when the employee is on leave. The Current Address stored in the Personal details form appears by default. The user can edit this. Note: It accepts alpha numeric & special character. The width of this field is limited to 250. |
Handed Over Work To |
Click the ellipse button to select a person to whom the work has to be allotted, during the period of absence. The employee Search form appears from where an employee can be chosen. |
Days Pending for Approval |
This displays the number of days for which approval is pending. For example, if the employee has already raised 4 leaves out of which 2 is yet to be approved, then this field will show 2. The Leave types for which the negative balance is not allowed should meet the following conditions: · If the available Leave balance is equal to ‘Leave pending for approval, system will not allow to raise any further Leave request. · The total number of Leave to be availed and Leave pending for approval should be less than or equal to the available Leave balance. |
FN (Fore Noon) |
Choose ‘FN’ option for leave in the forenoon (First half) |
AN (After Noon) |
Choose ‘AN’ option for leave in the afternoon (Second half) |
To apply for half day’s leave in a continuous leave period of more than one day – select the ‘From date’ and ‘To date’ · Choose ‘FN/AN’ option for half a day’s leave on the From date which you have chosen. · Choose ‘FN/AN’ option for half a day’s leave on the To date which you have chosen. For example, to apply leave from second half of Monday to first half of Wednesday, select from date and then choose the option ‘AN’, and select to date and then choose the option ‘FN’. This means that leave will be availed from second half of Monday to first half of Wednesday. The number of days will be considered as two. |
|
Phone No. |
Enter the Phone Number, to specify the contact number at which the employee would be available during the leave period. Note: It is possible to modify the Phone number. |
Support Document |
Click the [Browse] button and select a document that needs to be uploaded. Note: This will be mandatory/non-mandatory, based on the Support Document option set in the Leave Additional Configuration form. Documents attached here can be viewed in the Attachment view form (Personal Data ® Attachments ® Attachment View), after approval of the leave request. |
Employees to be notified |
This helps in informing the selected employees about the leave plan. Employee(s) selected in this field will get mail notification on submission of the leave request. On clicking the ellipse button, the Employee Search form appears, allowing searching and selecting employees. The search filter fields can be enabled/hidden using Label editor as required. This will facilitate in masking sensitive information like Grade, Designation etc. |
Available Leave Balance |
This displays the available leave balances. |
Recoverable Balance |
This displays the recoverable balance in the selected leave. |
Note:
If the employee has already taken a Birthday or Wedding Leave and this leave is configured for one application per year, then the employee will not be able to raise another leave form even if he/she changes the date of birth/wedding date in the personal record, if self service is being used in the organization.
Click [Submit].
|
An error message will be displayed when there is a date conflict. You should not apply leave again for the date for which the Leave has been applied already. |
Note: Based on the leave configuration, which has been set, certain leave types cannot be clubbed with other leave types. In such cases, the applications cannot be submitted. For example, it is configured that ‘Casual Leave’ cannot be clubbed with ‘Sick Leave’ then, an employee will not be able to avail Casual leave on the days, immediately before and after the Sick Leave dates.